Build Your Own Soil Moisture Sensor with Arduino
- dilanmeswani
- 3 days ago
- 3 min read
Have you ever come home to see your beloved house plant wilted and wondered if you had watered it too much, too little, or even forgot to water it at all? With a budget of $20, you can make a simple DIY soil moisture sensor that displays information about your plant's soil and when you should water it. Not only will your plant be green and healthy, but you'll also learn a little bit of engineering and coding along the way. Without further ado, let's get started!

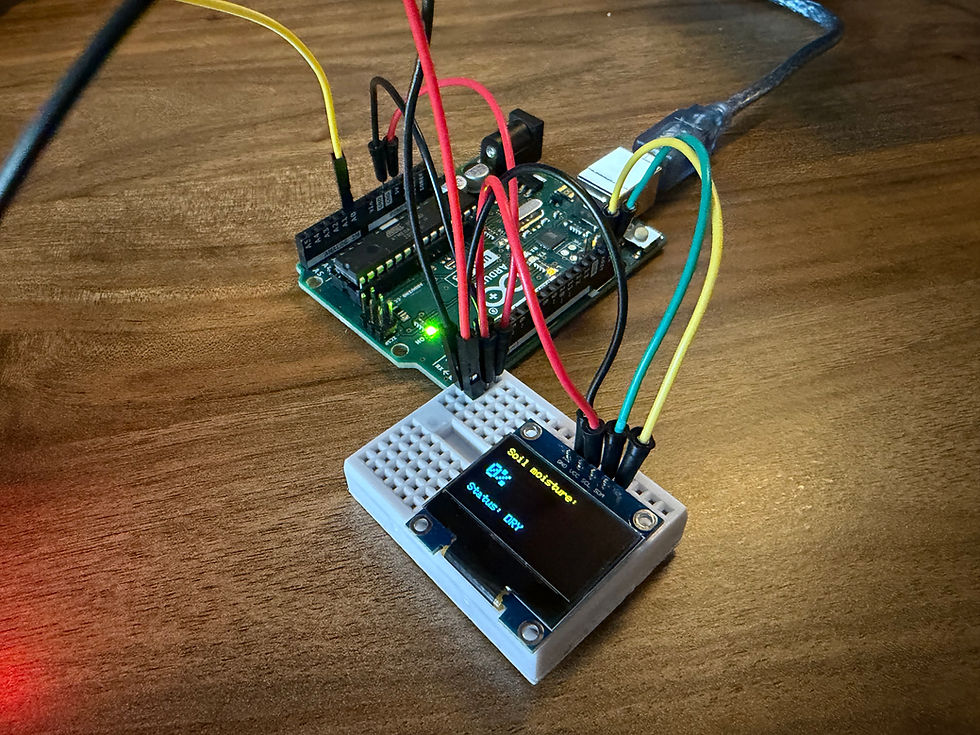
You'll need 5 main components, all of which you can find for relatively cheap on online retailers like Amazon or AliExpress. The most important part you'll need is a microcontroller, the brains of the operation. You have a lot of options to choose from, but I'd recommend the Arduino Uno for beginners. You'll also need a breadboard and some wires to connect everything together. I'm going to use a small breadboard, but really any size should do. For the wires, I'm using both male-to-male and male-to-female jumper wires. Next, you'll need an OLED screen. I like these screens because they're clear and easy to read, and some of them can even show fun colors. Finally, you'll need the water sensor itself. With all the components ready, let's get building!
First, we should establish our "power lines." Use a male-to-male jumper wire to connect the 5V pin on the microcontroller to your breadboard. Do the same thing with GND, but be sure to put it in a different column. With larger breadboards, connect the 5V pin to the positive power rail and GND to the negative one. Side note: it's also good practice to color-code your circuits. I like to use red for VCC and black for GND.
Next, let's wire the OLED screen. Place your screen on your breadboard, but leave a few holes open above the screen's four pins. Use two more jumpers to connect the 5V line to the VCC pin on the screen and the GND line to the screen's GND pin. Now, connect both SDA and SCL to their pins on the Arduino. This is important for establishing the flow of data between the Arduino and the screen.
Let's move on to wiring the water sensor. Connect three male-to-female wires to the sensor like so:
Then, attach the wire labeled "+" on the sensor to the VCC line on the breadboard. Do the same thing with the wire labeled "-", except this time attach the wire to the GND line. The last wire should be plugged into the A0 pin on the Arduino.
The last step is to flash the code to the board. Plug the Arduino into your computer and open up the Arduino IDE. You can download it on the Arduino website if you don't have it. Copy and paste the following into the IDE:
#include <Wire.h>
#include <Adafruit_GFX.h>
#include <Adafruit_SSD1306.h>

#define SCREEN_WIDTH 128
#define SCREEN_HEIGHT 64
#define OLED_RESET -1
#define SCREEN_ADDRESS 0x3C  // try 0x3D if 0x3C doesn't work

Adafruit_SSD1306 display(SCREEN_WIDTH, SCREEN_HEIGHT, &Wire, OLED_RESET);

int soilSensorPin = A0;  // change if your sensor is on a different pin

int dryValue = 0;  // You shouldn't need to change this
int wetValue = 700;   // depending on type of plant, change this

void setup() {
  Serial.begin(9600);

  if (!display.begin(SSD1306_SWITCHCAPVCC, SCREEN_ADDRESS)) {
    Serial.println(F("SSD1306 allocation failed"));
    for (;;);
  }

  //Simple start-up
  display.clearDisplay();
  display.setTextSize(1);
  display.setTextColor(SSD1306_WHITE);
  display.setCursor(0, 0);
  display.println(F("Starting up..."));
  display.display();
  delay(1000);
}

void loop() {
  int rawValue = analogRead(soilSensorPin);

  // This converts the raw value scale (0-1023) into a percentage scale (0-100)
  int moisture = map(rawValue, dryValue, wetValue, 0, 100);
  moisture = constrain(moisture, 0, 100);

  display.clearDisplay();
  display.setTextSize(1);
  display.setTextColor(SSD1306_WHITE);
  display.setCursor(0, 0);
  display.println(F("Soil moisture:"));

  display.setTextSize(2);
  display.setCursor(0, 20);
  display.print(moisture);
  display.println(F("%"));

  //You may want to change these thresholds
  display.setTextSize(1);
  display.setCursor(0, 50);
  if (moisture < 30) {
    display.println(F("Status: DRY"));
  } else if (moisture < 70) {
    display.println(F("Status: OK"));
  } else {
    display.println(F("Status: WET"));
  }

  display.display();

  //Stuff for serial monitor/debugging
  Serial.print("Raw: ");
  Serial.print(rawValue);
  Serial.print("  Moisture: ");
  Serial.print(moisture);
  Serial.println("%");

  delay(500);
}
You'll need to download some libraries, which you can do by clicking the books icon on the left side of your screen and searching for the libraries we need (the #include statements in the code). You can modify the code to better suit your needs if necessary. Lastly, click the blue arrow in the top left corner and wait. Congratulations, you just designed a soil moisture sensor!


Comments